Viewing entries tagged
Studio

Comment

Ballet and Lyrical Dance Session

Lyrical Danceoufit in split pose

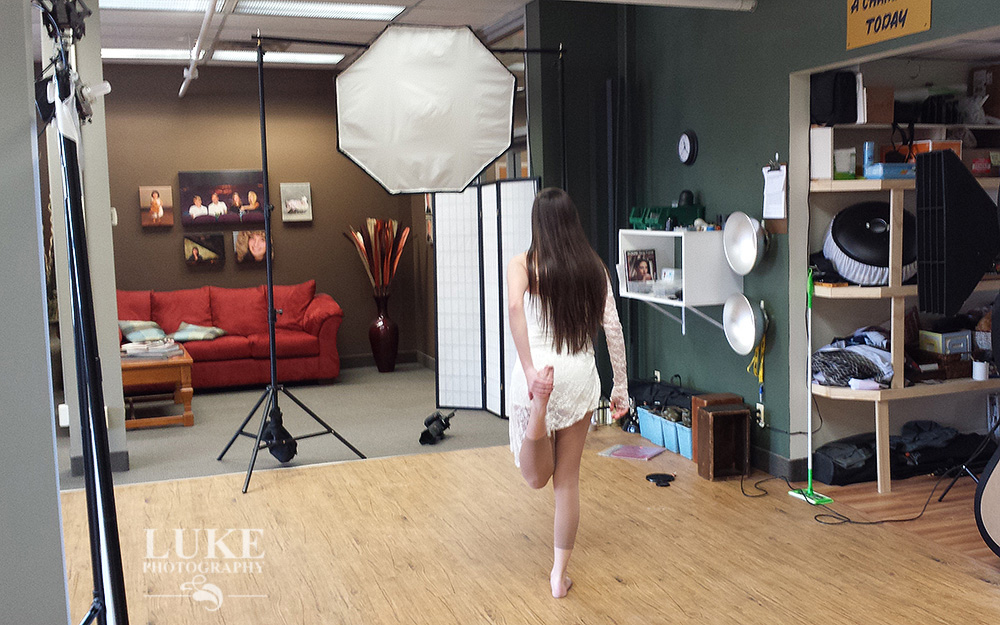
I had an intern at my Fairport studio for the months of December and January, and I wanted to take advantage of the fact that she was a dancer by having a dance-themed session before she returned to college for her spring semester.

Emily brought in a variety of dance outfits that she had worn to dance competitions while she was still in high school and we picked out several that we wanted to work with.  The lighting for the majority of the setups was consistent: two striplights on either side of her acting as main lights, and a large octabox in front of her...over the camera....acting as fill light to soften some of the shadows that would appear on her face from the strong sidelight.

For the final setup,we moved into the daylight-lit studio for a ballet setup using softer window light. I set up apiece of burgundy fabric to camera left to act as a stage curtain, and had Emily posed on the floor putting on her pointe shoes. The background was the bare brick wall of the studio.

Putting on ballet pointe shoes

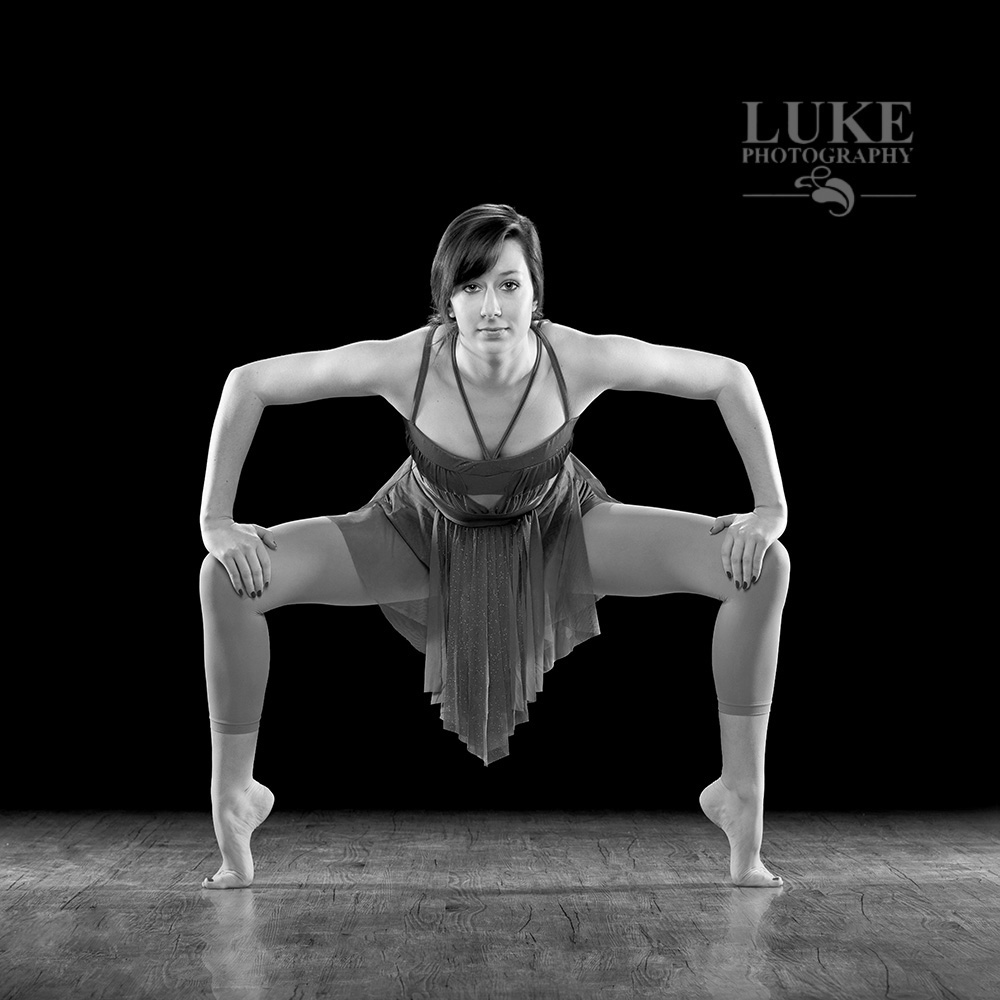
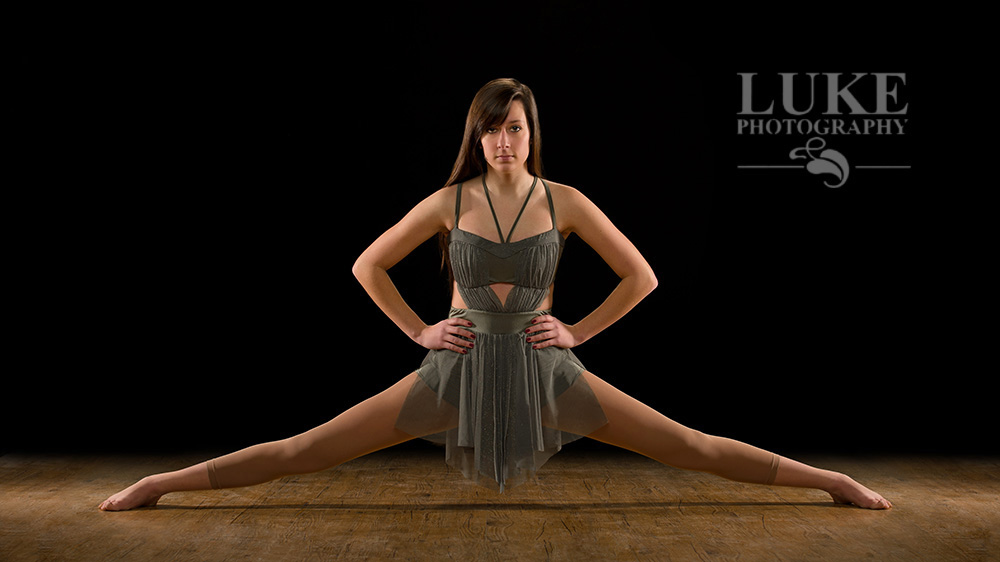
As I watched Emily suggest a number of poses that she has seen in magazines and dance publications, I had her make subtle position changes so that the resulting photo would look as good as possible.  She had to hold some of these ridiculously technical positions for extended periods of time until I was satisfied with the results. She was being a real trooper, but I felt like a hypocrite sitting comfortably on the floor while she was posed in very physically-challenging positions, so I offered to switch with her and have her take my photo, so I could feel what it was like to hold those positions.  Granted, I am more than 25 years her senior, but she was seriously impressed that I was even able to get in position, hold it, and get out of it without the need of a crane, hospital traction, and a wheelbarrow full of Advil. 

Comment

DIY Photo Umbrella Caddy

Comment

DIY Photo Umbrella Caddy

I have an assortment of light modifiers for my studio strobes and speedlights, including a variety of different-sized umbrellas.  Because more often than not they would end up on the floor in a pile that was just begging to be stepped on, I decided to bring by woodworking skills into play and build a caddy that would hold the umbrellas and other tall, thin equipment at the ready, while keeping them off the floor and away from clumsy feet.

I cut two pieces of plywood approximately 16 inches square, and glues them together at right angles using yellow wood glue.  If you want to strengthen the joint with angle brackets, you are more then welcome to do so.  I used rabbeted joints which prove to be very strong.

While the wood was drying, I cut 1.5" tall rings from a length of 3" PVC pipe.  I sanded all the edges of the PVC rings smooth using fine grit sandpaper.

Using special PVC cement designed specifically for use with this pipe, I glued all the rings together in the arrangement shown below and clamped them using a band clamp, which clamped all the pieces together at one time.

Let the PVC stay clamped according to the directions on the cement container.  When the cement had fully set, I sprayed the rings with a couple of light coats of white spray paint, to cover the mess that the purple PVC cement had left behind.

When the wood was fully dried, I sanded it with fine grit sandpaper and stained it, then covered it with several coats of polyurethane.  Because I never do things only half-way, I used 2 coats of cherry stain, and 4 coats of polyurethane, lightly sanding between coats to give it a very smooth finish.  Does this matter?  No.  But it's a curse that I make myself do things like this.

When the polyurethane was dry, I attached the set of rings to the vertical piece of plywood using screws and nuts, with washers on the back side.

When in use, the caddy keeps umbrellas, monopods, and any other tall, thin equipment out of the way and standing at the ready, whenever they are in need.


Comment

1 Comment

Light Stand Wheeled Dolly

Universal Light Stand Dolly

I needed wheels on the light stands in my studio, to make moving them around easier and quicker.  A friend gave me a set of casters that fit over the legs of the light stands, and I thought I was in business.  However, I found that the tube part of the casters did not fit the legs of my light stands.  I soon discovered that the diameter of the legs on all of the light stands in my studio were not equal....different manufacturers used different sized tubing for the legs of their stands, which set me off on a mission to create a rolling dolly base that would fit all my light stands, regardless of the diameter of the legs.

Ingredients:

Nine lengths of 3/4 inch plywood, cut into 2.5 inch strips
Metal strapping
Foam sheets
Three casters

Design

I planned a design using 3/4 inch plywood, which is plentiful in my woodshop.  I first cut the plywood into 2.5 inch strips.  I needed nine individual pieces, which I cut into the following lengths:

            three that were 22 inches long;

            six that were 19 inches long

Round the corners of one end of each of the 22” pieces.

Glue up the three sets so that the 22” length is on top of one leg section, in the middle of the 2nd section, and on the bottom of the 3rd section.  When you glue up each set, make sure that the squared ends are aligned, and that the rounded end of each 22 inch piece extends beyond the ends of each of the 19 inch pieces.


Leg 1   22 inch top layer

      19 inch middle layer

      19 inch bottom layer


Leg 2   19 inch top layer

      22 inch middle layer

      19 inch bottom layer


Leg 3   19 inch top layer

      19 inch middle layer

      22 inch bottom layer

Universal Light Stand Dolly - Joint Detail

Universal Light Stand Dolly  - detail of joint

Assembly

When the glue has dried, lay out the leg sections together, so that the rounded ends are towards the center, and the square ends radiate out from the center.  Make sure the rounded ends are overlapping appropriately, then drill a hole through the middle of the rounded over ends, to accept a 3” bolt that ties them all together.

I sanded all the wooden surfaces, then primed and painted them.  To keep the light stand legs tight to the dolly, I used strips of metal strapping that can be found in the plumbing aisle of most big box hardware stores.  I attached a piece of foam to each piece of strapping, then screwed them to the squared off end of each leg, making a stirrup.  The foam is merely to prevent scraping the paint off the legs of the light stand and ensure a more secure fit.  Attach one caster to the bottom of each leg, directly under the location where the light stand leg will fit in the stirrup.

Universal Light Stand Dolly - caster and stirrup detail

Once each leg of the dolly is complete, attached the rounded ends of the dolly with a 3 inch bolt, careful to put a large washer both above and below the contact points with the wooden legs.  Do not over-tighten the bolt, as you may need to adjust the angle of each leg as you set the light stand on it, to ensure that each leg is 120 degrees from the adjacent legs.

Installation

Once finished, set the light stand on the dolly, spreading the legs of the light stand so that each on engages a stirrup at the end of each dolly leg.  When in place, tighten the knob on the light stand, locking the legs in place.  You should be able to lift the light stand and the dolly should move with it, if the stirrups are correctly positioned and the light stand legs are properly in place.

The beauty of this design is that it should fit any light stand that I have in the studio, and the weight of the light stand (and anything on it) is transferred down the legs of the light stand and directly to the casters...there should be no weight on the center of the dolly.

Universal Light Stand Dolly

1 Comment